Although many Bosch Smart System eBikes are not equipped with any display, you may want to retrofit a Kiox 300 display on yours.
Starting from 2022 Bosch has decided to sell many of their ebikes equipped only with the control unit and its led remote, without any display. A single cable connects the unit with the system. It’s a minimalist choice, nevertheless if you prefer keeping your eye on some important information, you can retrofit a Kiox 300 Display.
Let’s show you how to mount al Kiox 300 in a few steps
With the new system, the montage is simpler than ever.
Please notice that Kiox 300 is exclusively compatible with Bosch Smart system, that’s on the market since 2022, actually only with the Bosch Performance Line CX, Speed and Cargo Smart System. We believe that following Smart system drives will be equipped exactly in the same way. You can see in the video below all you need to mount the Kiox 300, although you may prefer this written step-by-step description.
-

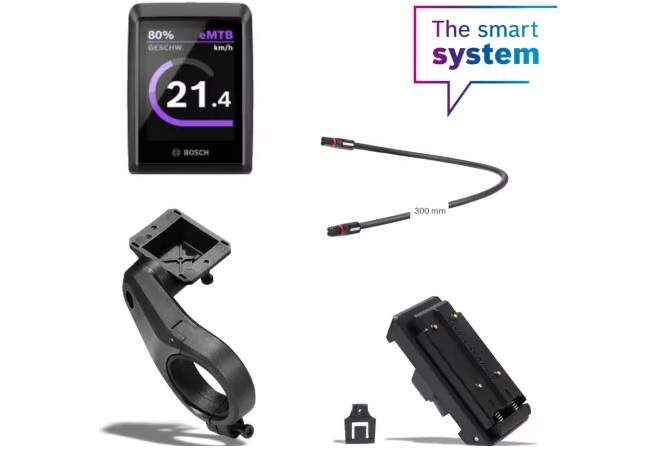
- Bosch Kiox 300 on Smart System retrofit

-
- Bosch Kiox 300 arm holder

-
- Tightening the display holder on the single arm holder

Start with the Kiox 300 itself
There is a single arm support for handlebars with a diameter of 31.8 mm or 35 mm. Now you can see the contacts to the display and the display outlets, picture number two.
To be remarked here: the display can have two different connections, one with the outlets aiming backward at you, with the springs always ahead. The other connection is aimed forward, just like the springs. This is crucial for the way and the place where you intend to mount the Kiox 300. Later on we will go into further details on that, straight on the eBike.
You need also a shorter display cable, to connect the display with the led remote
The cable is available in our shop, you can choose the length that best suits your handlebar, also depending on where you prefer to position your display, from 10 cm to 2 m. Before you order a montage kit, you should decide how you would like to mount the Kiox 300 on your handlebar. It’s most commonly mounted with a single arm bracket right on the middle of the handlebar, or even a little farther to the left, in this case the cable outlets would aim at you. You can of course mount the display in a different way, if you attach the holder on the other side.
This way the Kiox would be set above the stem and you have a little more space to the front. In this case you must choose to mount the display with the cable outlet aiming forward. That’s why you should make this decision before ordering your set.
Mounting steps
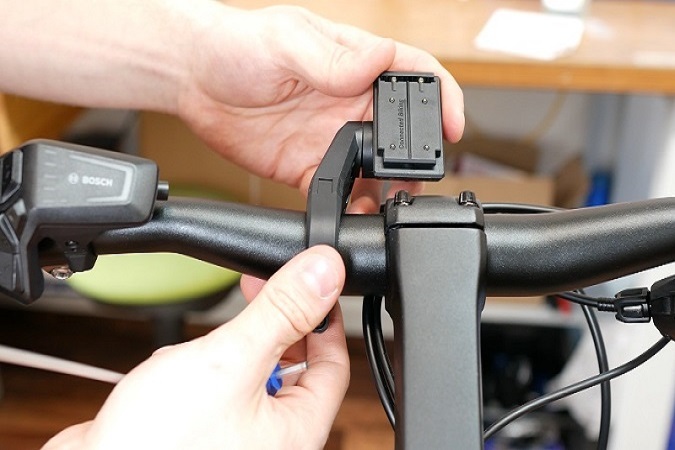
To start mounting, you should mount the display holder on the single arm holder. Simply insert the mount into the bracket – verifying that the cable outlets are positioned correctly.
Now tighten the whole thing with a 3mm allen key (picture 3 above). A torque wrench with 1 NM tightening torque would fit perfectly. Tighten both screws to connect the display holder. Now you can mount the display. To do so, first click into place the upper side of the Kiox 300, the one with the spring. Now it’s ready to go.
-
- The display holder is mounted on the single arm holder
-
- Connecting the Kiox 300 with the Led Remote

-
- Connecting the Kiox 300 with the Led Remote

The display holder has got a little safety splint. When you stick it in, it blocks the spring, so that the display cannot be taken away or stolen. If you seldom leave your e-bike outside, for instance for shortstops at the grocery store, you can use the safety to prevent thefts. This way, in order to take out the display you must unscrew it. Without the safety, you can easily take the display with you.
Now you can go to your eBike and first unplug the led remote. Then you attach the single arm holder to the handlebar – roughly align and tighten with the 3mm Allen key – 1 Nm is also optimal here. Before screwing the display holder, you should connect it with the led remote (picture 5 and 6 above) using the above-mentioned additional short display cable. You can choose the length of this cable according to the width of your handlebar and the position of your display.

Connecting the Kiox 300 with the motor
The connection is very easy. There is a white marking both on the plug, and on the socket, see picture 5. To plug it in, simply align the two white marks.
It doesn’t matter which of the two connectors you plug it in. Push that plug into the socket until you overcome a little resistance. Finally, neatly set the cable along under the handlebar and once again align the two white marks into the led remote. The display holder is connected with the control unit. Finally you have to plug the other display cable coming from the motor into the still available socket (picture 7). This cable is available in different lengths too, so if your cable is too long, you can install a shorter one.
Once you have connected the cables, you should tighten the screw of the display holder, after setting it the way you prefer. When you’re satisfied with all the settings, check out all the screws once again. Now you can put the display on the holder and switch the led remote on. The display recognizes it automatically and lights on.
Find more ebike tips here.


I have a mini remote that connects wireless to the system controller therefore no cables are coming to the cockpit. A guide to connect system controller to the cockpit area is needed
Hi Dario,
Thank you for your useful precisions.
Cheers,
Luca
My Bosch Smart System ebike has a System Controller and Mini Remote. Is there a way to retrofit it with a Kiox? Thanks!
Hi,
Thank you for your interest. There sure is, you can retrofit it yourself, all the necessary parts are here: Kiox-300.
Keep up the good biking
Luca
I am looking into upgrading my batavus Harlem 2023. Which retrofit kit work? Kiox? Connectmodule?
Hello Mikael,
Since we don’t list Batavus in our online shop, I don’t know a great deal about this bike. The one, that shows up during an online search is a bike without Bosch’s Smart System drive. So Kiox would be a display, you could upgrade your bike with. The Bosch ConnectModule is a GPS tracker specifically for Bosch Smart System.
Cheers, Matthias