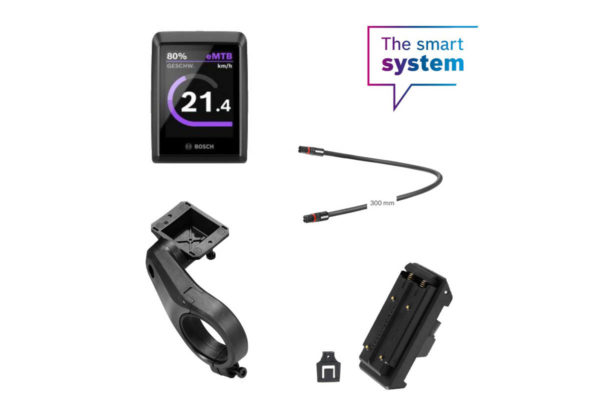
Since 2022, many Bosch ebikes have only been delivered without a display and with the LED Remote control unit. If you wish, you can upgrade such systems with the Bosch Kiox 300 display. This can be done in just a few steps.
We have already shown this in a video. If you wish, you can read about the most important work steps here again.
1. Necessary components and tools
2. Place the mount
3. Connect the Kiox 300 to the ebike system
4. Final check
1. Necessary components and tools
It’s easier than ever to change the display in the Bosch Smart System. You will need the following::
- Bosch Kiox 300 display
- Single-arm mount for handlebars with a diameter of 31.8 to 35 millimetres, including adapter tray and three corresponding screws
- Display mount
- Display cable between 10 cm and 2 m long
- Anti-theft device
- 3 mm Allen key
Please note that there are two versions of the display mount. The first is a variant in which the cable outlet points backwards. This means that the cables will later be routed out of the Kiox 300 towards the handlebars. In the second variant of the display mount, the cable outlet points forwards in the direction of travel. You can orientate yourself by the spring of the display mount. This always points in the direction of travel.
Before you order a conversion kit, you should know how and where you want to mount the Kiox 300 on your handlebars. On the one hand, the single-arm mount can be aligned so that the Kiox 300 is later placed centrally in front of the handlebars in an imaginary extension of the stem. In this case, the cable outlet would have to point towards you. Alternatively, you can mount the display holder so that the arm points towards the bike and the display is positioned directly above the stem. In this case, you will need the display mount with the cable outlet facing in the direction of travel.
2. Positioning the mount
The first step in the conversion is to mount the display mount on the single-arm mount. To do this, simply insert the mount into the adapter tray of the mount. Make sure that the cable outlets point in the desired direction. Then screw the two together using two screws and a 3-millimetre Allen key. Bosch recommends a torque of one Newton metre.
Now you can attach the display for the first time. To do this, place it at the top side with the spring and then click it into place over the lower edge. The display mount also includes a theft protection device in the form of a small locking pin. This can be used to protect the screw on the underside of the mount, which is located opposite the cable outlet. Above the screw, there is an elongated slot. The cotter pin can be inserted into this slot with a little pressure. This secures the display. The cotter pin blocks the spring so that the Kiox 300 can no longer be removed from the holder. This is primarily recommended for those who regularly park their ebike outside with the display. However, if you tend to remove the Kiox 300 after every ride, you can do without the lock. Otherwise, the Kiox 300 can only be removed if you first loosen both screws on the display mount.
3. Connect the Kiox 300 to the ebike system
The next step is to mount the display and mount on the handlebars. To do this, pull the plug of the cable coming from the motor out of the LED Remote. Then attach the single-arm mount to the desired position on the handlebars. Tighten the screw on the handlebar clamp again with a 3-millimetre Allen key. Only loosely at first, so that you can still change the position of the mount.
Now connect the LED Remote to the display mount of the Kiox 300 using the additional display cable mentioned earlier. Orientate yourself by the white markings when inserting the cable. These can be found on both the plug and the sockets of the cable outlet of the display mount and the LED Remote. White to white is the motto here. Which socket you choose on the display mount is irrelevant. Both work as a port.
The motor cable that was originally in the LED Remote and has been dangling loosely on the handlebars for a few steps can now be connected to the second port on the display mount. This completes the connection to the motor. Since the cable previously reached the control unit, it will now be a little too long. You can either wrap it around the handlebars once or, alternatively, get a shorter version.
Once all the cables are connected, the next step is to attach the single-arm mount to the handlebars and the screw in the mount, which determines the angle at which you look at the Kiox 300 using a joint. The Allen key is used again as a tool. Tight again means a torque of one Newton metre.
4. Final check
Once you have tightened all the screws and checked the cables one last time, you can switch on your ebike using the LED Remote. When it starts up, it should automatically detect the new Kiox 300 and activate it. If that works, you can set off on your first ride with the new display. Have fun!
Picture: Elektrofahrrad24 GmbH

